Managing clients effectively is crucial for any business, and Corexta makes it easy to add and manage clients within your company account. With Corexta’s Client Signup and Management Features, you can streamline client onboarding, ensure seamless collaboration, and maintain accurate records of all business relationships.
In this guide, we’ll walk you through the process of adding clients to your Corexta account, enabling client signup, and managing client approvals—step by step. Let’s get started! 🚀
🔹 The Benefits of Using Corexta’s Client Management
A well-organized client management system helps businesses in multiple ways:
✅ Automated Client Onboarding – Clients can register themselves with a signup link.
✅ Controlled Access – Admins can approve or deny new client registrations.
✅ Seamless Communication – Keep track of client details, projects, and interactions.
✅ Enhanced Security – Manage client permissions and prevent unauthorized access.
✅ Time Efficiency – Reduce manual client entry and focus on business growth.
With Corexta’s Client Management, you gain complete control over how clients register and interact with your company.
🔹 Step 1: Login to Your Corexta Company Account
Before adding a client, you need to access your Corexta Company dashboard:

1️⃣ Visit Corexta.com
2️⃣ Click “Login” and enter your credentials
3️⃣ Once logged in, navigate to Settings from the left menu bar
Now, you’re ready to configure your client signup settings! 🎯
🔹 Step 2: Enable Client Signup in Corexta
To allow clients to register themselves, follow these steps:

1️⃣ Click on App Settings
2️⃣ Navigate to Client Signup Settings
3️⃣ You’ll see two client signup options:
- Allow Client Signup: Enabling this will display a signup button on the login page, allowing clients to register themselves.
- Need Admin Approval After Client Signup: Enabling this means newly registered clients must be approved by the admin before they can access the system. If disabled, clients can log in immediately after signup.
By enabling Allow Client Signup, you’ll receive a unique client signup URL like this: 📌 Example: https://app.corexta.com/client-signup/8f97659517bfec4ea6ecac82159c7bec
You can share this link via email, text messages, WhatsApp, or any communication channel to invite clients to sign up.
🔹 Step 3: How Clients Register Using the Signup Link
Once you provide your unique signup link, clients can register themselves by:
1️⃣ Clicking on the signup link you shared
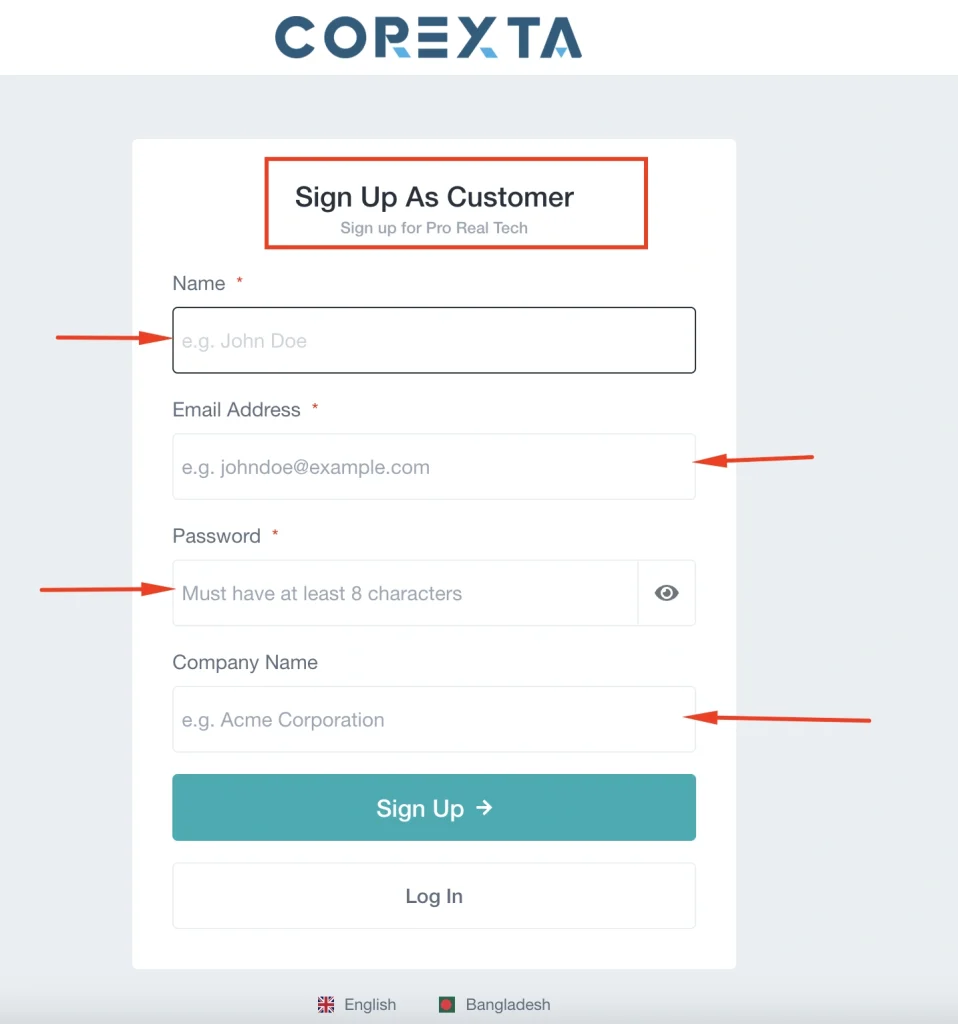
2️⃣ Filling in their Name, Email Address, Password, Company Name, and other required information
3️⃣ Submitting the form to complete their registration
🔹 If admin approval is enabled, the client will only gain access once you approve their request.
🔹 Step 4: Managing Clients on Your Dashboard
After a client registers, they will automatically appear in your Client List. You can:

✅ View client profiles and details
✅ Edit client information (if they missed adding details during signup)
✅ Update billing, projects, and communication records
✅ Enable or disable client access as needed
🔹 This ensures that your client database is organized, up to date, and easily accessible.
Conclusion
Adding clients to your Corexta company account is simple and efficient. By enabling client signup, you can streamline onboarding, control access, and maintain organized client records effortlessly.
In our next guide, we’ll cover how clients can register their own Corexta account and complete their profile setup. Stay tuned! 🚀