Over the past few years, the testing landscape has undergone significant evolution. Traditional Testing methods are no longer used due to the increasing complexity of software products. Manual testing sure had its strengths in using human intuition and simpler test flows, but it was not scalable and prone to human error. Moreover, companies usually run on tight deadlines and budgets that cause them to deliver products much faster. But speed cannot be achieved at the cost of quality. Launching a high-quality, bug-free product matters more than just quick delivery. If the customer is not satisfied with the performance of the product, the time, cost, and effort in building it all go to waste. Thus, quality matters.
There are basically three types of testing approaches: manual, automated, and AI testing. Automation testing was one step above manual, yet it had its own challenges that required testers to write test cases in a programming language. That created a technical barrier in testing. But AI came as a rescue to this, along with many more features. In this article, we will explore what AI testing is, its benefits, and see its real-life usage in testing Corexta’s features.
What is AI Testing?
Artificial intelligence is spreading across all domains in the world. And testing is not shielded by it. Its immense capabilities to mimic human intelligence in software systems are making it increasingly adopted by all software companies. Software is always in a state of flux as more and more abstraction is introduced into it. The goal of abstraction is to hide all the complexities and provide a simplified and intuitive UI. The instructions to the system must be as simple as possible, and the system should be intelligent enough to carry out all the related tasks by itself.
AI testing is no different than this. AI-based software testing tools provide endless possibilities to enhance the quality of the testing process. These tools are especially designed by QA experts who have spent decades learning about all the nitty details of software testing. They know what the common challenges of software testing are, what the loopholes are, and how to make the overall testing process more efficient. All this knowledge was crystallized to create AI-powered software testing tools that work with their own intelligence and greater autonomy.
Features of AI Testing Tools
The features incorporated in AI testing tools are no different than AI features in any other tool. It can generate content, repair itself, predict outcomes, and automate the process like any other AI tool. But when it comes to testing, these features become narrowed to fit the QA world. Let’s explore them individually.
Auto-generation of Test Cases
This feature is what places AI testing tools above automated testing tools. AI-powered testing tools can generate test cases automatically through human prompts in natural language. Using its GenAI models, it understands the instructions in simple language and a brief description of the application and generates test cases accordingly. The test cases can be developed to either test individual features or all at once at the application level. testRigor, as an automated software testing tool, powered by GenAI at the backend, is one such tools that leverage this feature.
Self-healing
One of the biggest challenges in software testing is the maintenance of test suites. Software products often go through frequent updates in the features, logic, or backend code. While new test cases are needed to validate those changes, old test cases are also required to perform regression testing. Updating the old test cases whenever the software goes through an upgrade is a pain. But AI-powered testing tools have the feature of self-repairing their test cases. They adapt to the frequent changes in the software and continue to run the same test cases without any maintenance overhead.
Predictive Analytics
Manual testing can only test a software in its existing state. The features are tested to determine if they can fulfill business objectives or not. But AI testing takes it one step further. It can not only test the existing software but also predict the bugs that are most likely to occur in the future. It does so by analyzing historical patterns of the defects and their relevant fixes. Based on that knowledge, it identifies the high-risk areas and notifies the user of them. Testers can use this insight to perform testing with extra care for those high-risk areas of the product. This makes the product not only bug-free in the present state but also future-proof.
Test Automation
What this means is that the test cases are not only generated automatically but also executed and logged. All you need to do is to integrate the AI testing tool with the application while creating the test suite. Once done, the test creation, execution, and defect logging can all be done by just mouse clicks. A test case, once created, can be run any number of times with a simple click.
Testing Corexta using an AI Testing Tool
Corexta is a business management platform that empowers agencies to streamline operations by unifying project management, client relations, finance, HR, payroll, recruiting, assets, and communication in a single, customizable workspace. With role-based access, real-time collaboration, and modular tools, it scales with your business to drive efficiency and growth.
To demonstrate how AI-based testing can be done on its features, we are going to use testRigor, which is one of the widely used AI testing tools. Let’s go step-by-step.
1. Integrating Testing Tool with the Application
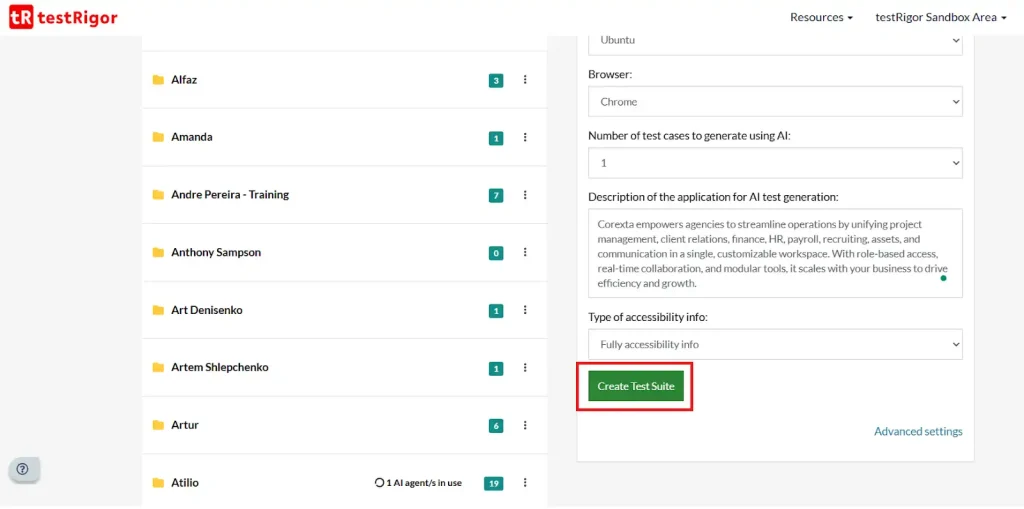
To integrate testRigor with Corexta, let’s log in to testRigor first, and you will see the following screen. All you need to do is provide the Test Suite Name, Corexta URL, and description, and leave the rest of the fields with their default values.

Once you hit the “Create Test Suite” button, your application integrates instantly with testRigor, and your first test suite is created.
2. Log in to the Application and Check Dashboard
Once the test suite has been created, you must create your first test case by clicking on “Add Test Case”. Once the window pop-up opens, you can provide the login instructions with credentials as follows:
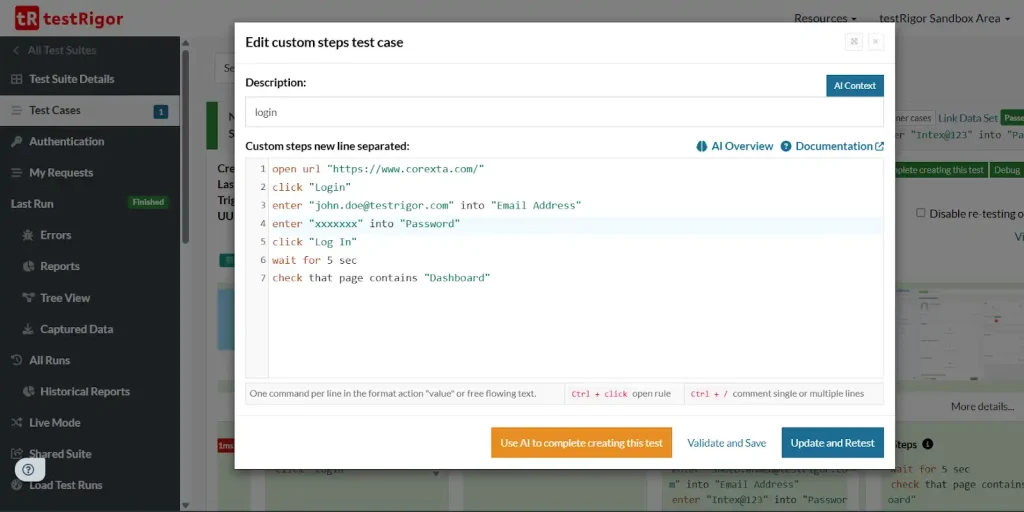
Notice that the last line of instruction is used for checking if the Dashboard is being displayed or not.
Once you hit Retest, the test case will be executed, and a series of screenshots will appear on testRigor as follows:

Notice how it highlights the button “Login” that it clicks in the automated run based on the instruction we provided.
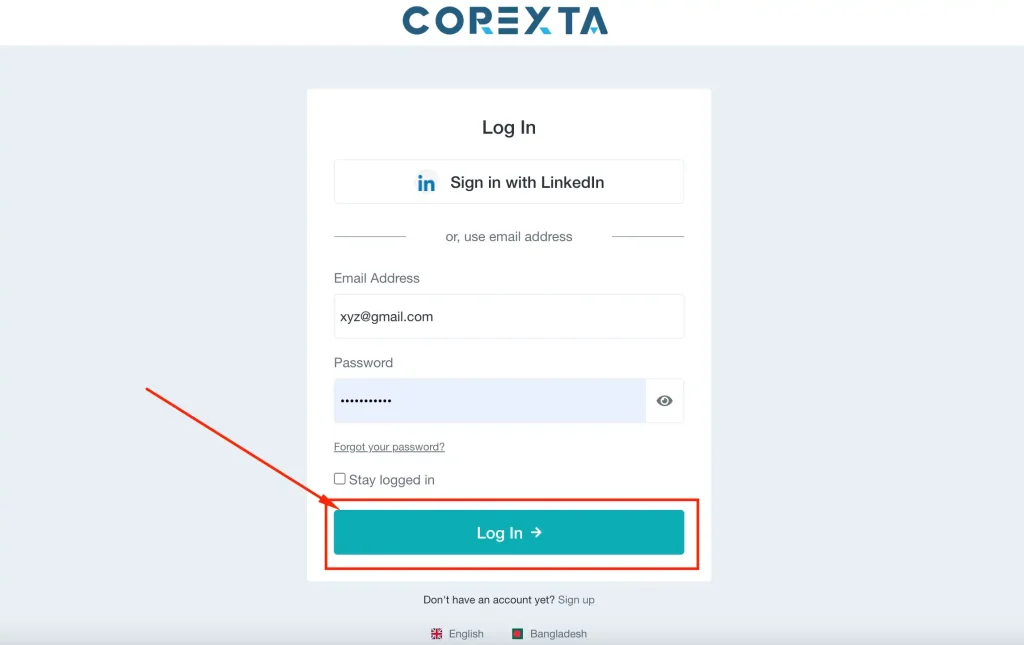
Next comes the login screen, where it enters the credentials we provided in the test script, and presses the button Log In as highlighted below.
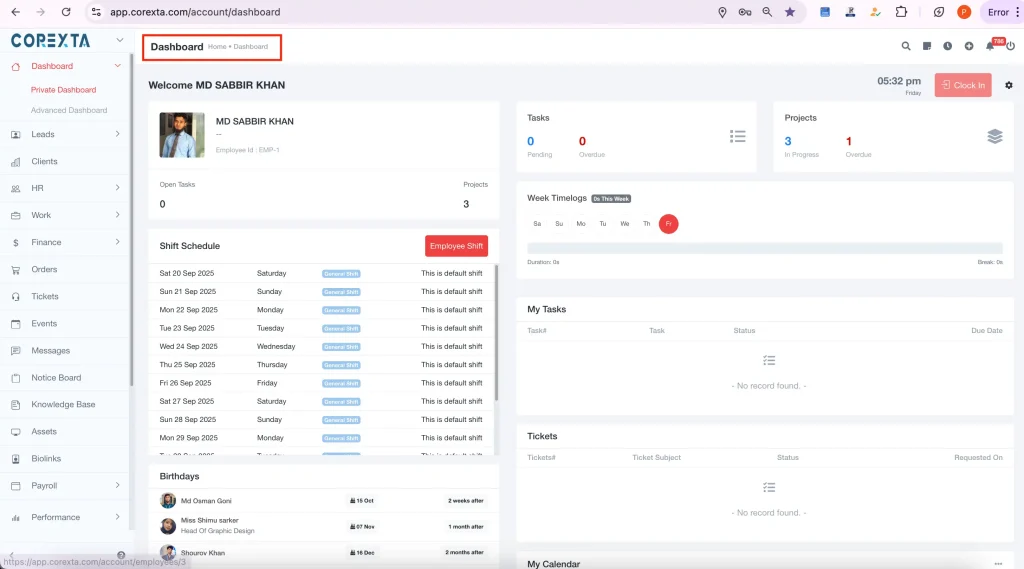
Finally, it checks if the Dashboard is being displayed or not by searching for the keyword “Dashboard” on the screen. When it finds it, it highlights it on the screenshot as we can see below:
3. Add a Project
Once the Dashboard is displayed correctly, you can add a new project by giving the following commands and check if the new project has been added successfully or not.
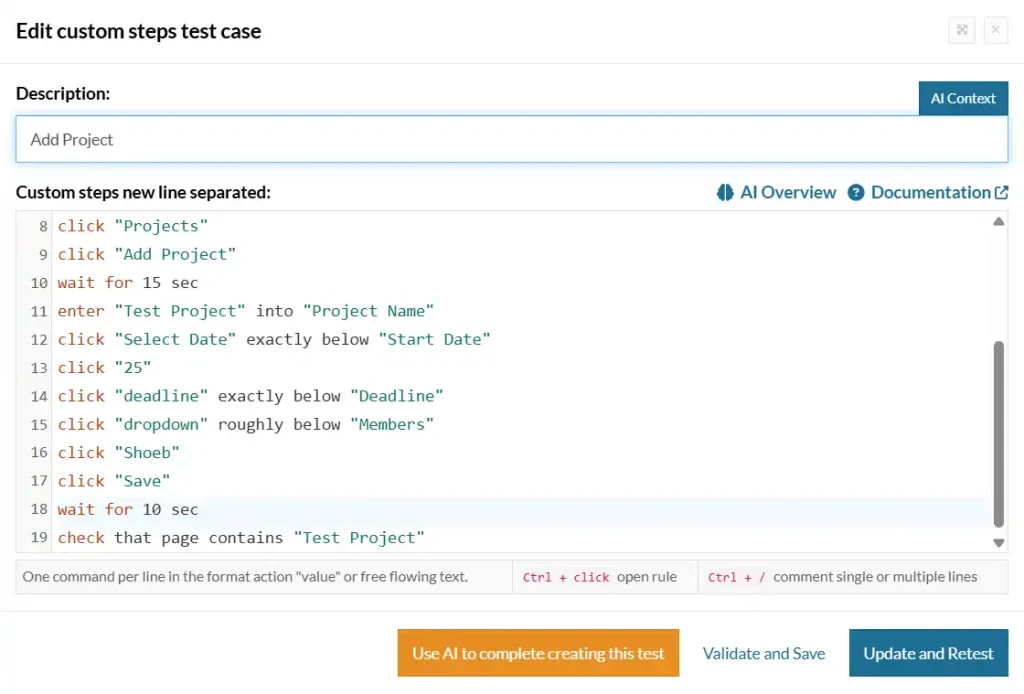
Once the above commands start executing, testRigor follows the workflow of creating the project through the following steps shown in the screenshots below.
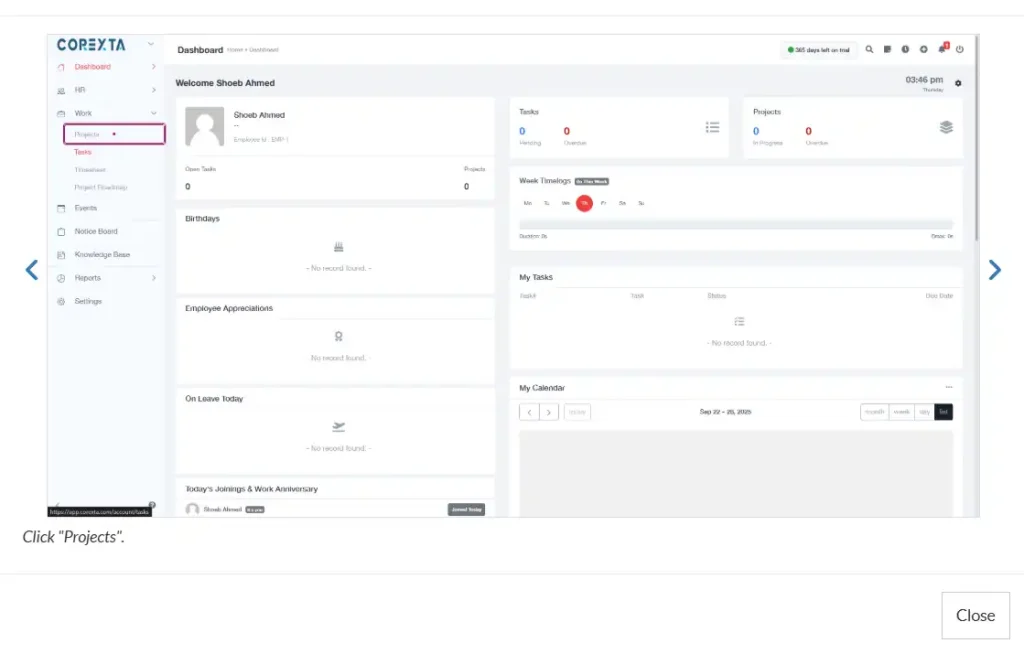
Notice how it highlights the button “Projects” when it clicks it automatically.
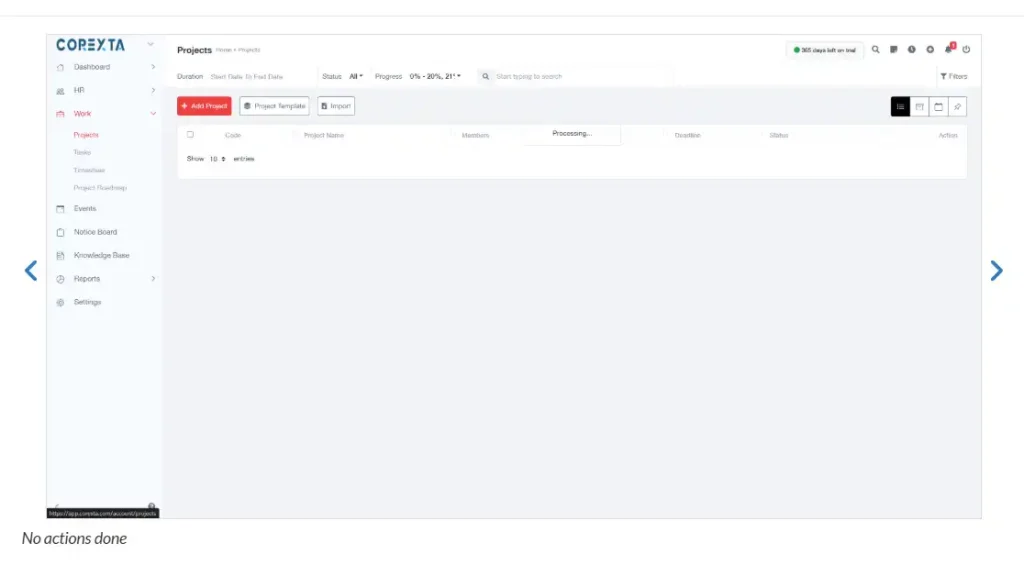
The next screenshot shows the Projects Page as below:
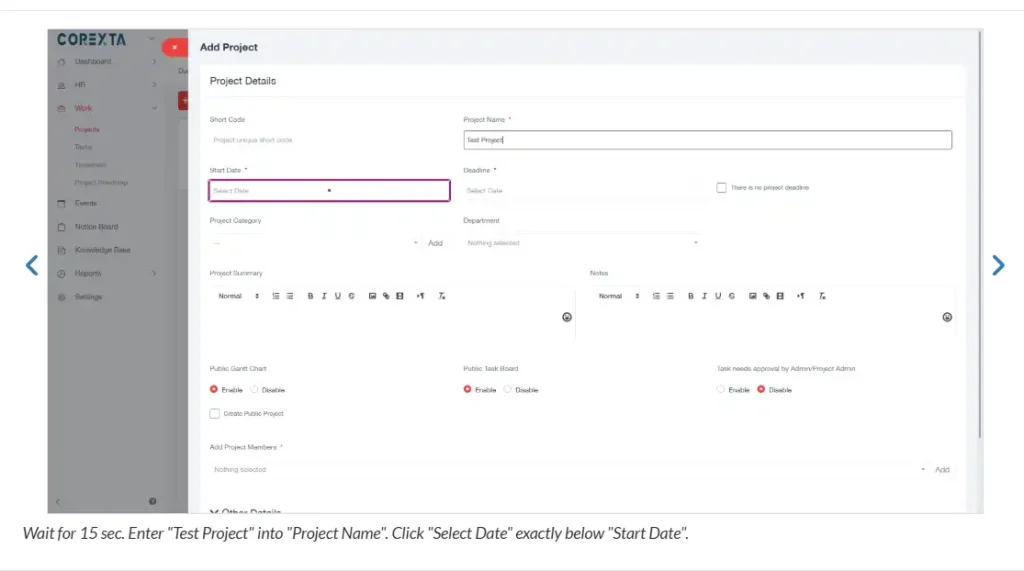
Once it clicks on the “Add Project” button, the following screen shows up where the tool enters all the required fields in the form.
After filling up all the fields in the project creation form and pressing the save button, it checks if the new project by the name “Test Project” appears in the list or not. Notice how it highlights the project name inside the green rectangle.
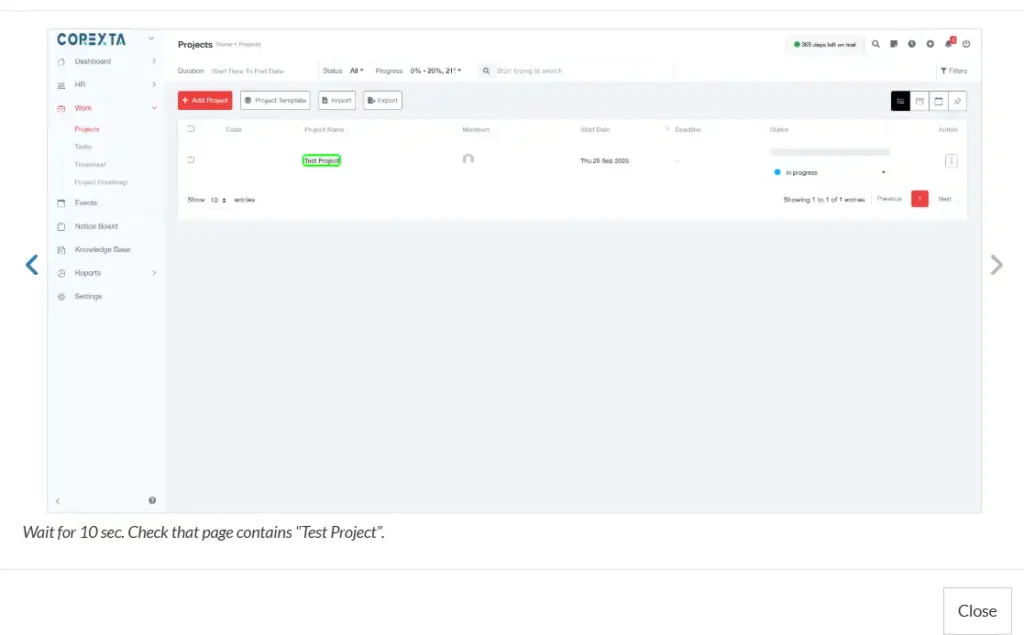
With this, we have successfully tested the creation of the project and its display on the list.
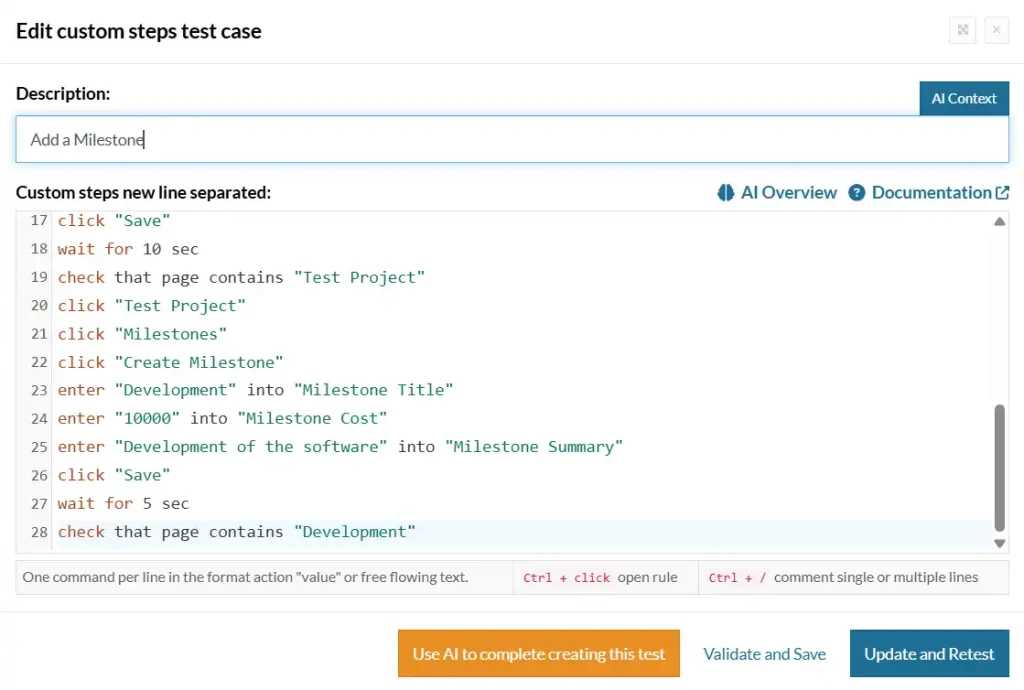
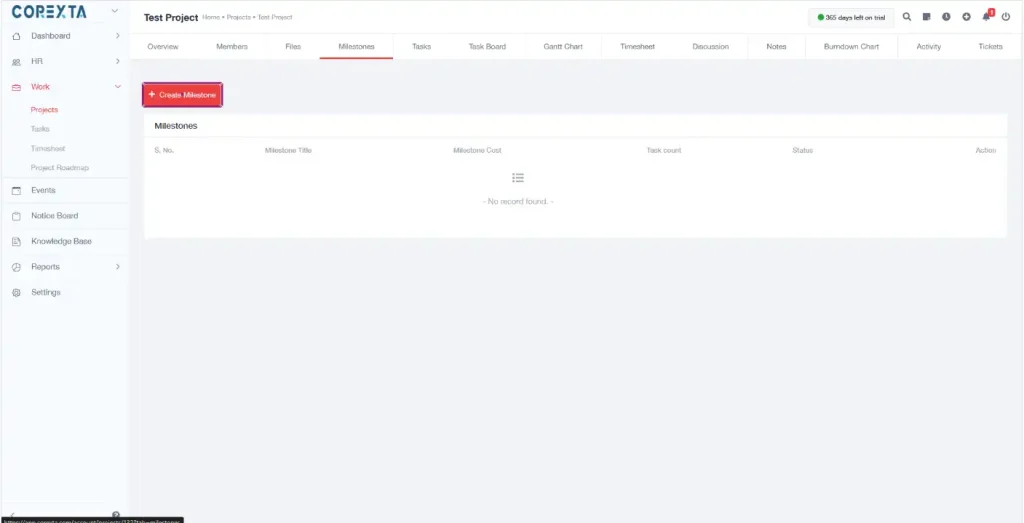
4. Create a Milestone inside the Project
Once the project has been created, we can add milestones inside it. Below are the steps you would need to write the test case for creating a milestone and validating it.
Once you hit run, the testing tool will execute this step on the application and generate a series of screenshots for every step.
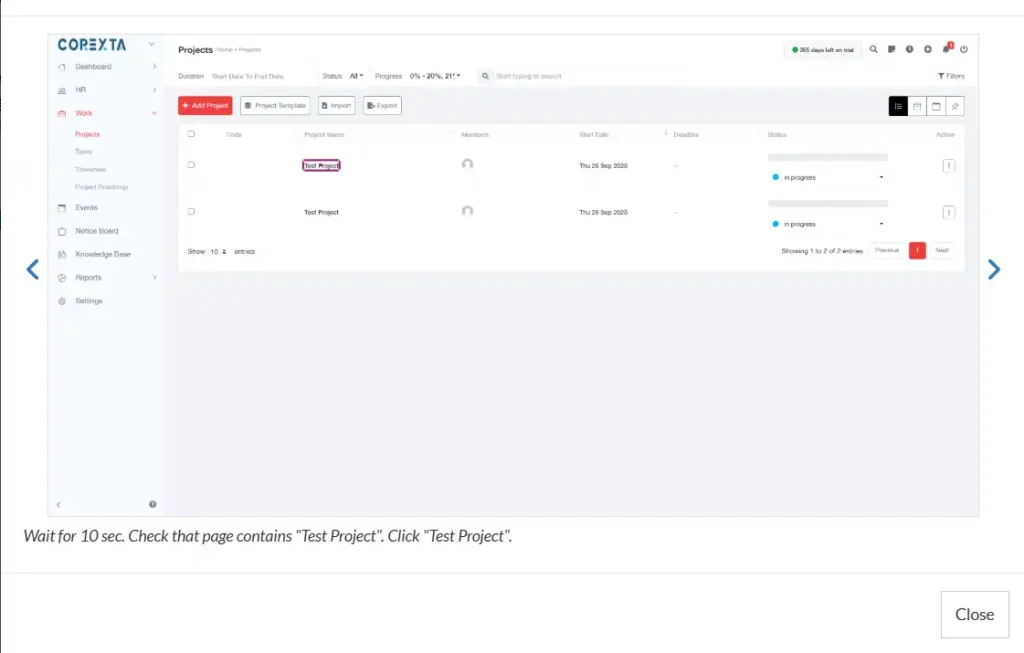
The following step shows the first step towards creating a milestone, which is by clicking on the project.
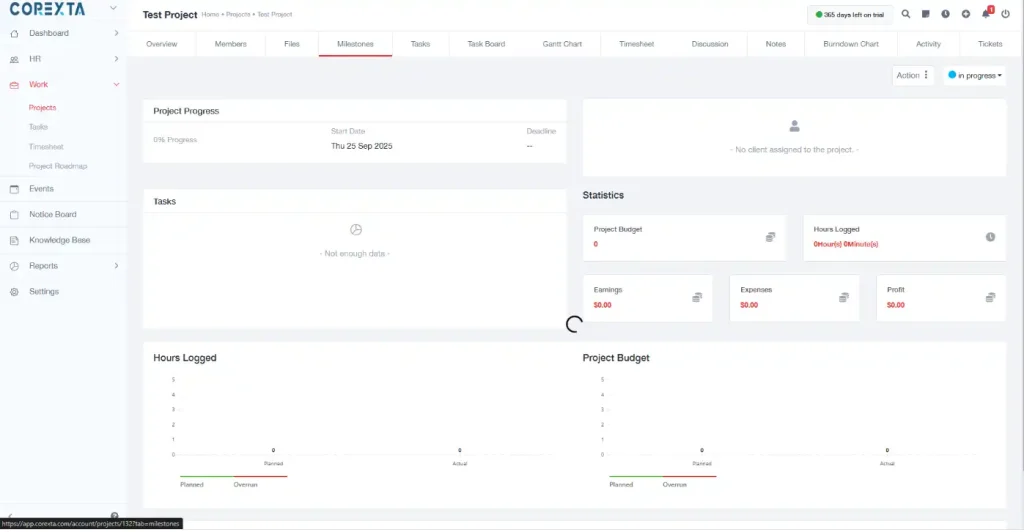
The next screenshot shows the page where details about the project are displayed. One of the tabs in the top bar shows a button for a milestone, which the tool clicks.
Next, it clicks on the button called “Create Milestone” as highlighted below.
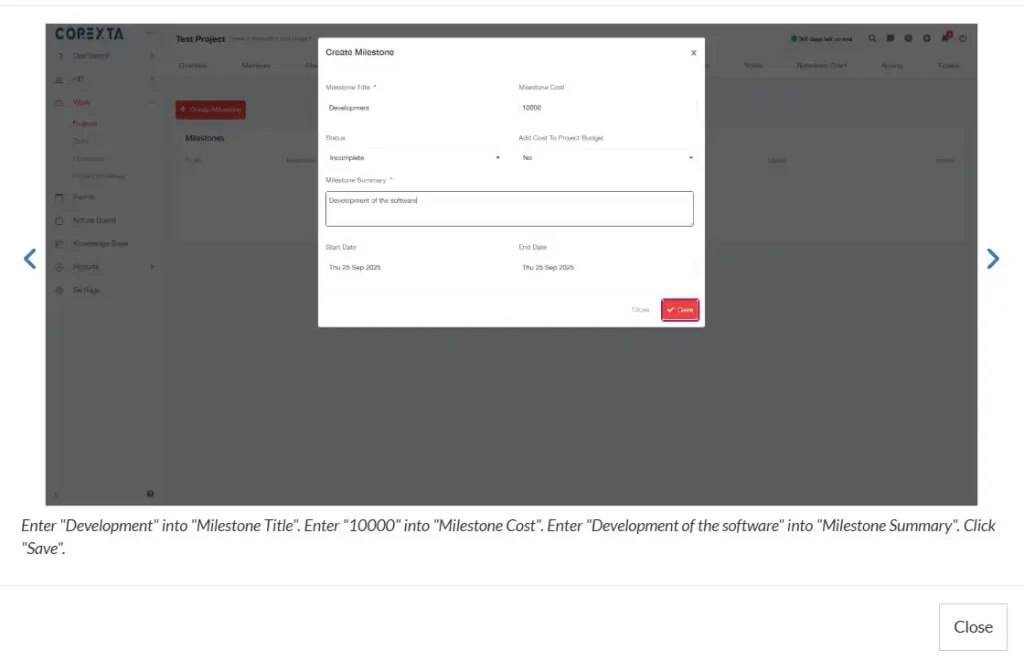
The following screen appears, which asks for the details about the milestone. The tool enters all the details as given in the commands and finally clicks save.
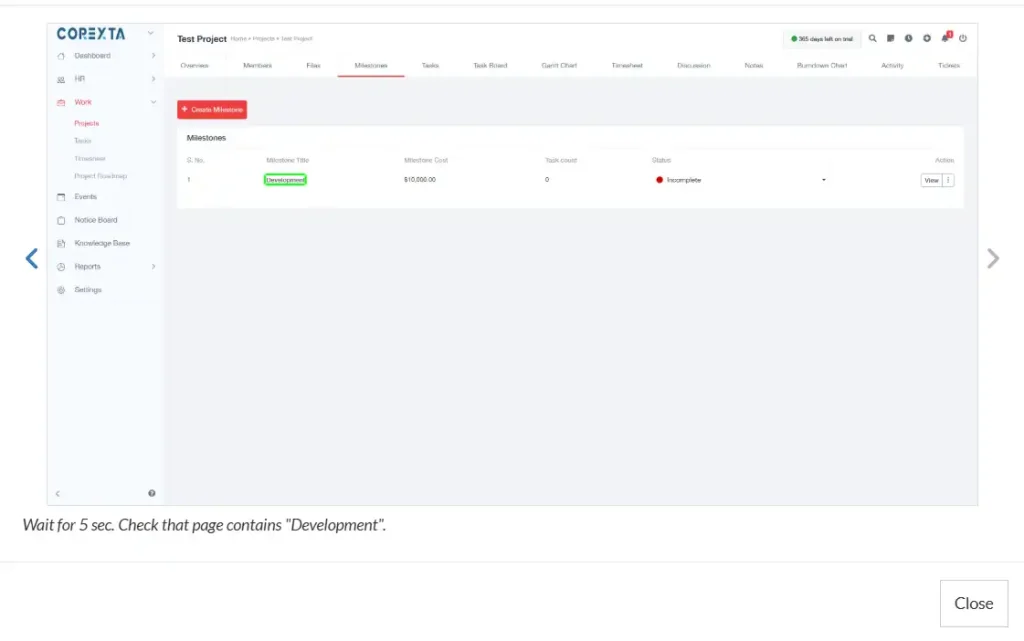
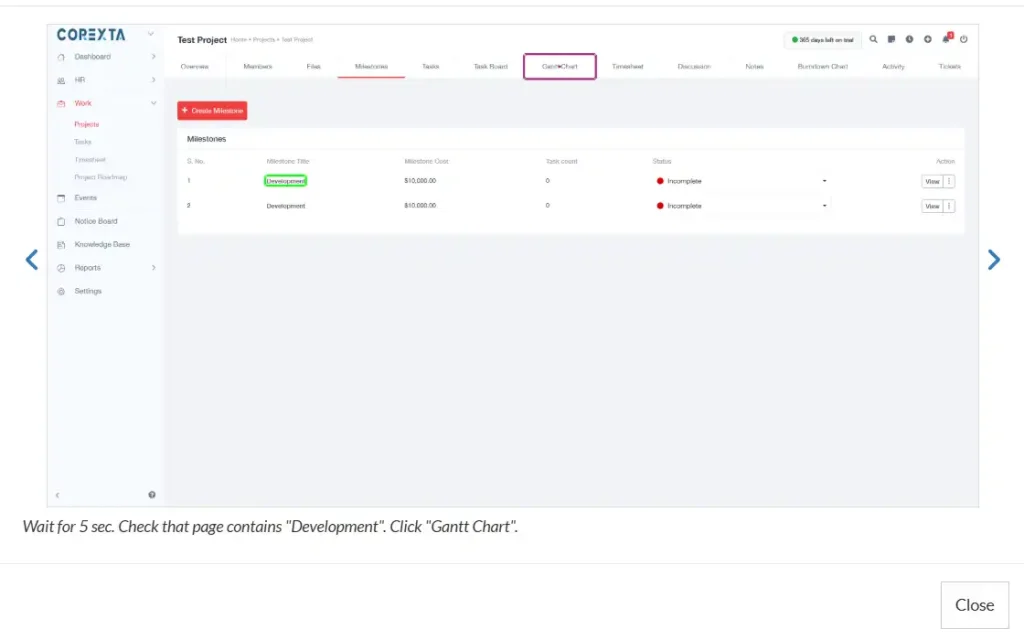
As a final step, it checks if the milestone has been created successfully or not by validating its display on the screen. We created the milestone by the name “Development,” and it shows clearly on the screen under the green rectangle.
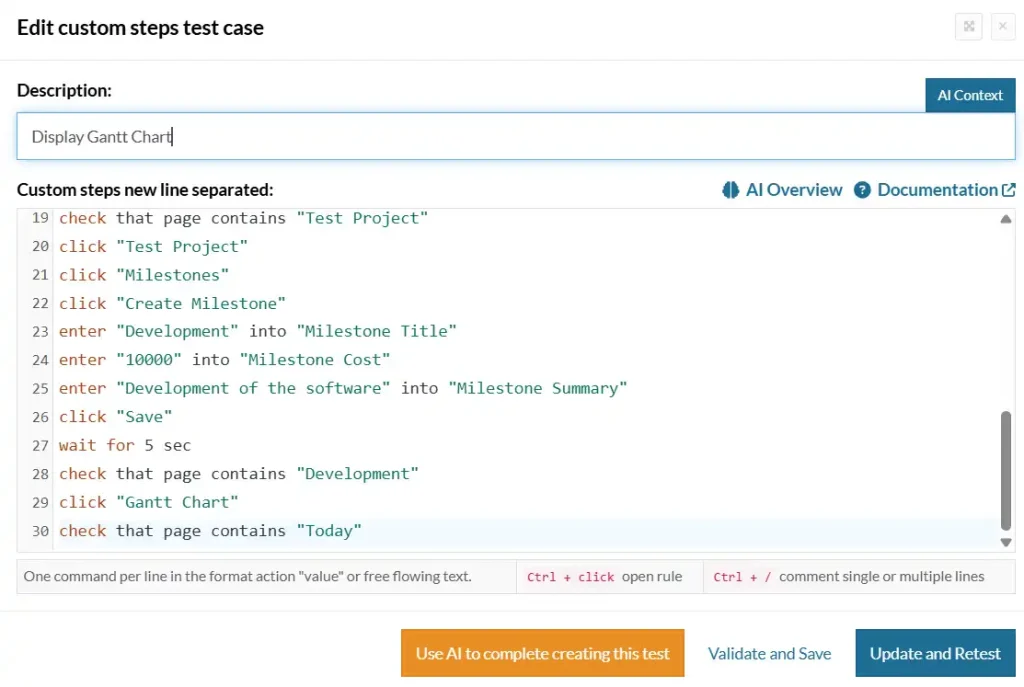
5. Display Gantt Chart
Once the project and milestone have been created, displaying the Gantt chart is a piece of cake. All you need to do is add two more commands in the previous test case to click on the Gantt Chart button and check if the chart displays correctly or not.
The screenshot below shows the two additional commands at the bottom of the instructions.
The next screenshot highlights the button that the tool clicks to access the Gantt Chart. Notice the button inside the purple rectangle.
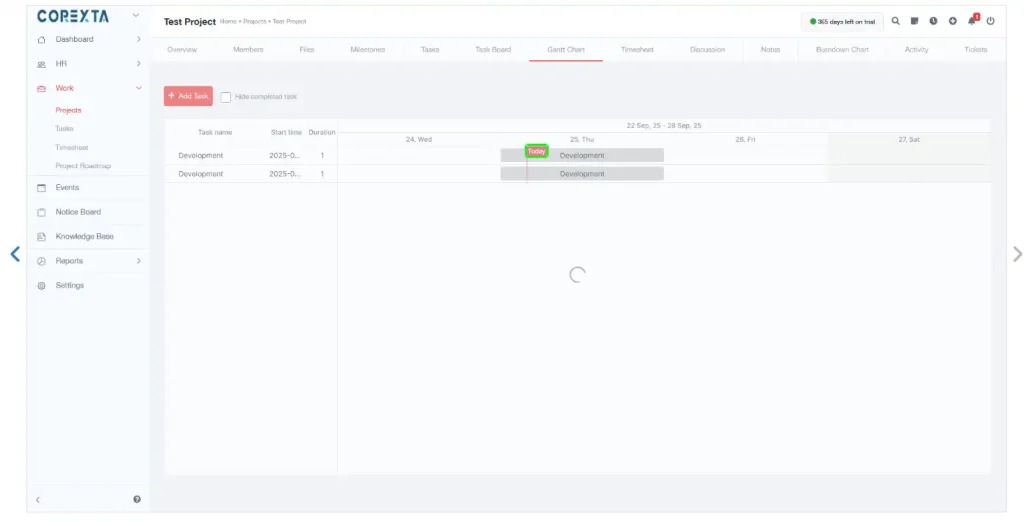
Once the tab for the Gantt Chart is clicked, the chart is displayed in the screenshot as follows:
Final Thoughts
In this article, we have successfully demonstrated how an AI testing tool can be used for automating the testing process through simple instructions. Another great feature of testRigor is that it can create all the test cases without even writing instructions in simple language. All it needs is to be fed with the description of the application, and it will generate the test cases by itself. But since we specifically wanted to test the features like project creation, milestones, and Gantt charts, we created separate test cases for them.
The best thing about these test cases is that once you have created them, you can reuse them as many times as required. This is especially useful in regression testing, where existing functionality needs to be validated after any recent change. The AI testing tools have not only eased our testing processes but also provided us with the bandwidth to perform exploratory testing and come up with new ideas to improve the quality of the product. Integrating automation testing with your application is the best way to create a robust product that will win your customers’ trust and loyalty.